In this post, we’ll explore how to host applications for free on your local network while making them securely accessible from anywhere over the internet using Cloudflare Tunnels. I’ve been running various applications this way for over a year, and it’s been a major upgrade in how I run services on my network. The ability to host applications locally while accessing them through any web browser has opened up exciting possibilities for running services without ongoing cloud costs.
1 What You Can Build
Before diving into the technical details, let’s look at some real examples of what you can run. I’m currently hosting:
- Jupyter notebooks for AI development, running on my GPU AI workstation - it’s like a private version of Google Colab
- Open WebUI - a free, open-source AI chat interface that can use both locally-running models via Ollama and OpenAI’s models through their API plus any other models that support the OpenAI API format - it’s like a private version of ChatGPT
- Access to my router’s web configuration and network management
- Application and network monitoring through Uptime Kuma
- Direct access to my Synology NAS and its applications such as Surveillance Station and File Hosting
- PiKVM for remote hardware management of my AI workstation
- A local TV streaming service using a HD HomeRun tuner that I built using Fast HTML and FFmpeg
- Various development and testing environments

All of these applications run on my local hardware but are accessible through any web browser, needing only an internet connection, without the need to install a VPN.
2 Key Benefits
Here’s why this approach is valuable:
Cost Efficiency: Running applications locally can be dramatically cheaper than cloud hosting. My NAS has over 30TB of storage - hosting this in the cloud would cost hundreds monthly.
Hardware Utilization: Use your existing hardware, including GPUs for AI workloads, without paying cloud compute costs.
Privacy Control: All data remains on your local network, with Cloudflare only acting as a secure gateway.
Simplified Access: No VPN needed - just open a browser and log in. This is especially useful when using computers where you can’t install a VPN client.
Certificate Management: Cloudflare handles all SSL certificates automatically - no more managing or renewing certificates manually.
Zero Port Forwarding: No need to expose ports on your router or manage dynamic DNS.
3 How Cloudflare Tunnels Work
A Cloudflare Tunnel creates a secure connection between your local network and Cloudflare’s edge network through these components:
- A lightweight daemon runs locally, establishing an outbound connection to Cloudflare
- Traffic is routed through Cloudflare’s global network to your local services
- All traffic is encrypted end-to-end
- Authentication and access controls are managed at the edge
The architecture looks like this:
Cloudflare Tunnel Architecture:
Browser -> Cloudflare Edge -> Encrypted Tunnel -> Local Daemon -> Your Services
This design eliminates the need for inbound firewall rules while providing enterprise-grade security features.
4 Getting Started
Let’s walk through setting up your first Cloudflare Tunnel. You’ll need:
- A domain name (can be registered through Cloudflare or elsewhere)
- A Cloudflare account
- Docker installed on your local machine
- An application you want to make accessible
4.1 Initial Setup
First, register your domain with Cloudflare or point your existing domain’s nameservers to Cloudflare. While propagation can technically take up to 24 hours, it usually completes within minutes.
For the smoothest experience, I recommend: - Setting up Docker before starting (Synology NAS comes with it pre-installed) - Installing Portainer for easy Docker management - Having your applications ready to expose - Follow along with the Cloudflare Zero Trust setup guide
4.2 Running the Tunnel
The easiest way to run the tunnel is through Docker. Here’s a basic command:
docker run -d \
--name cloudflared \
--restart unless-stopped \
cloudflare/cloudflared:latest \
tunnel --no-autoupdate run --token YOUR_TUNNEL_TOKEN
The --restart unless-stopped flag ensures the tunnel restarts automatically after system reboots. You should copy and paste the docker command from your Cloudflare Zero Trust dashboard which will have your token already included. Before running the command, you should edit it to include the extra arguments specified above.
4.3 Adding Access Rules to Secure Your Applications
The first thing you’ll want to do after creating the tunnel is to set up Access Rules. This is where you’ll define who can access your applications. This is an important step to keeping your applications and local network secure.
Set up a default access group and wildcard subdomain application definition to ensure all new applications are secure by default.
Navigate to Access -> Access Groups

Click on the “Add a Group” button
Enter a name for your access group (ex: “Default Access Group”)
Check the “Set as default group” checkbox
Under “Define group criteria” -> “Include” -> “Selector” select “Emails” and add the list of email addresses you want to have access to your applications separated by commas. Only include email addresses you trust and ones you’re sure you want to have access to your applications.
Click “Add require” at the bottom of the section.
Under “Require” -> “Selector” select “Country” and add the country you want to allow access from. This is a great extra security measure to further lock down access to your applications. You can always change this later.
Click “Add exclude” at the bottom of the section.
Under “Exclude” -> “Selector” select “Country” and add the country you want to block access from. I have added Russia, China, and North Korea to my exclude list because state sponsored hacking from these countries is more common.
Add any additional rules you want to further secure your applications.
Finally, click “Save” at the bottom of the page.

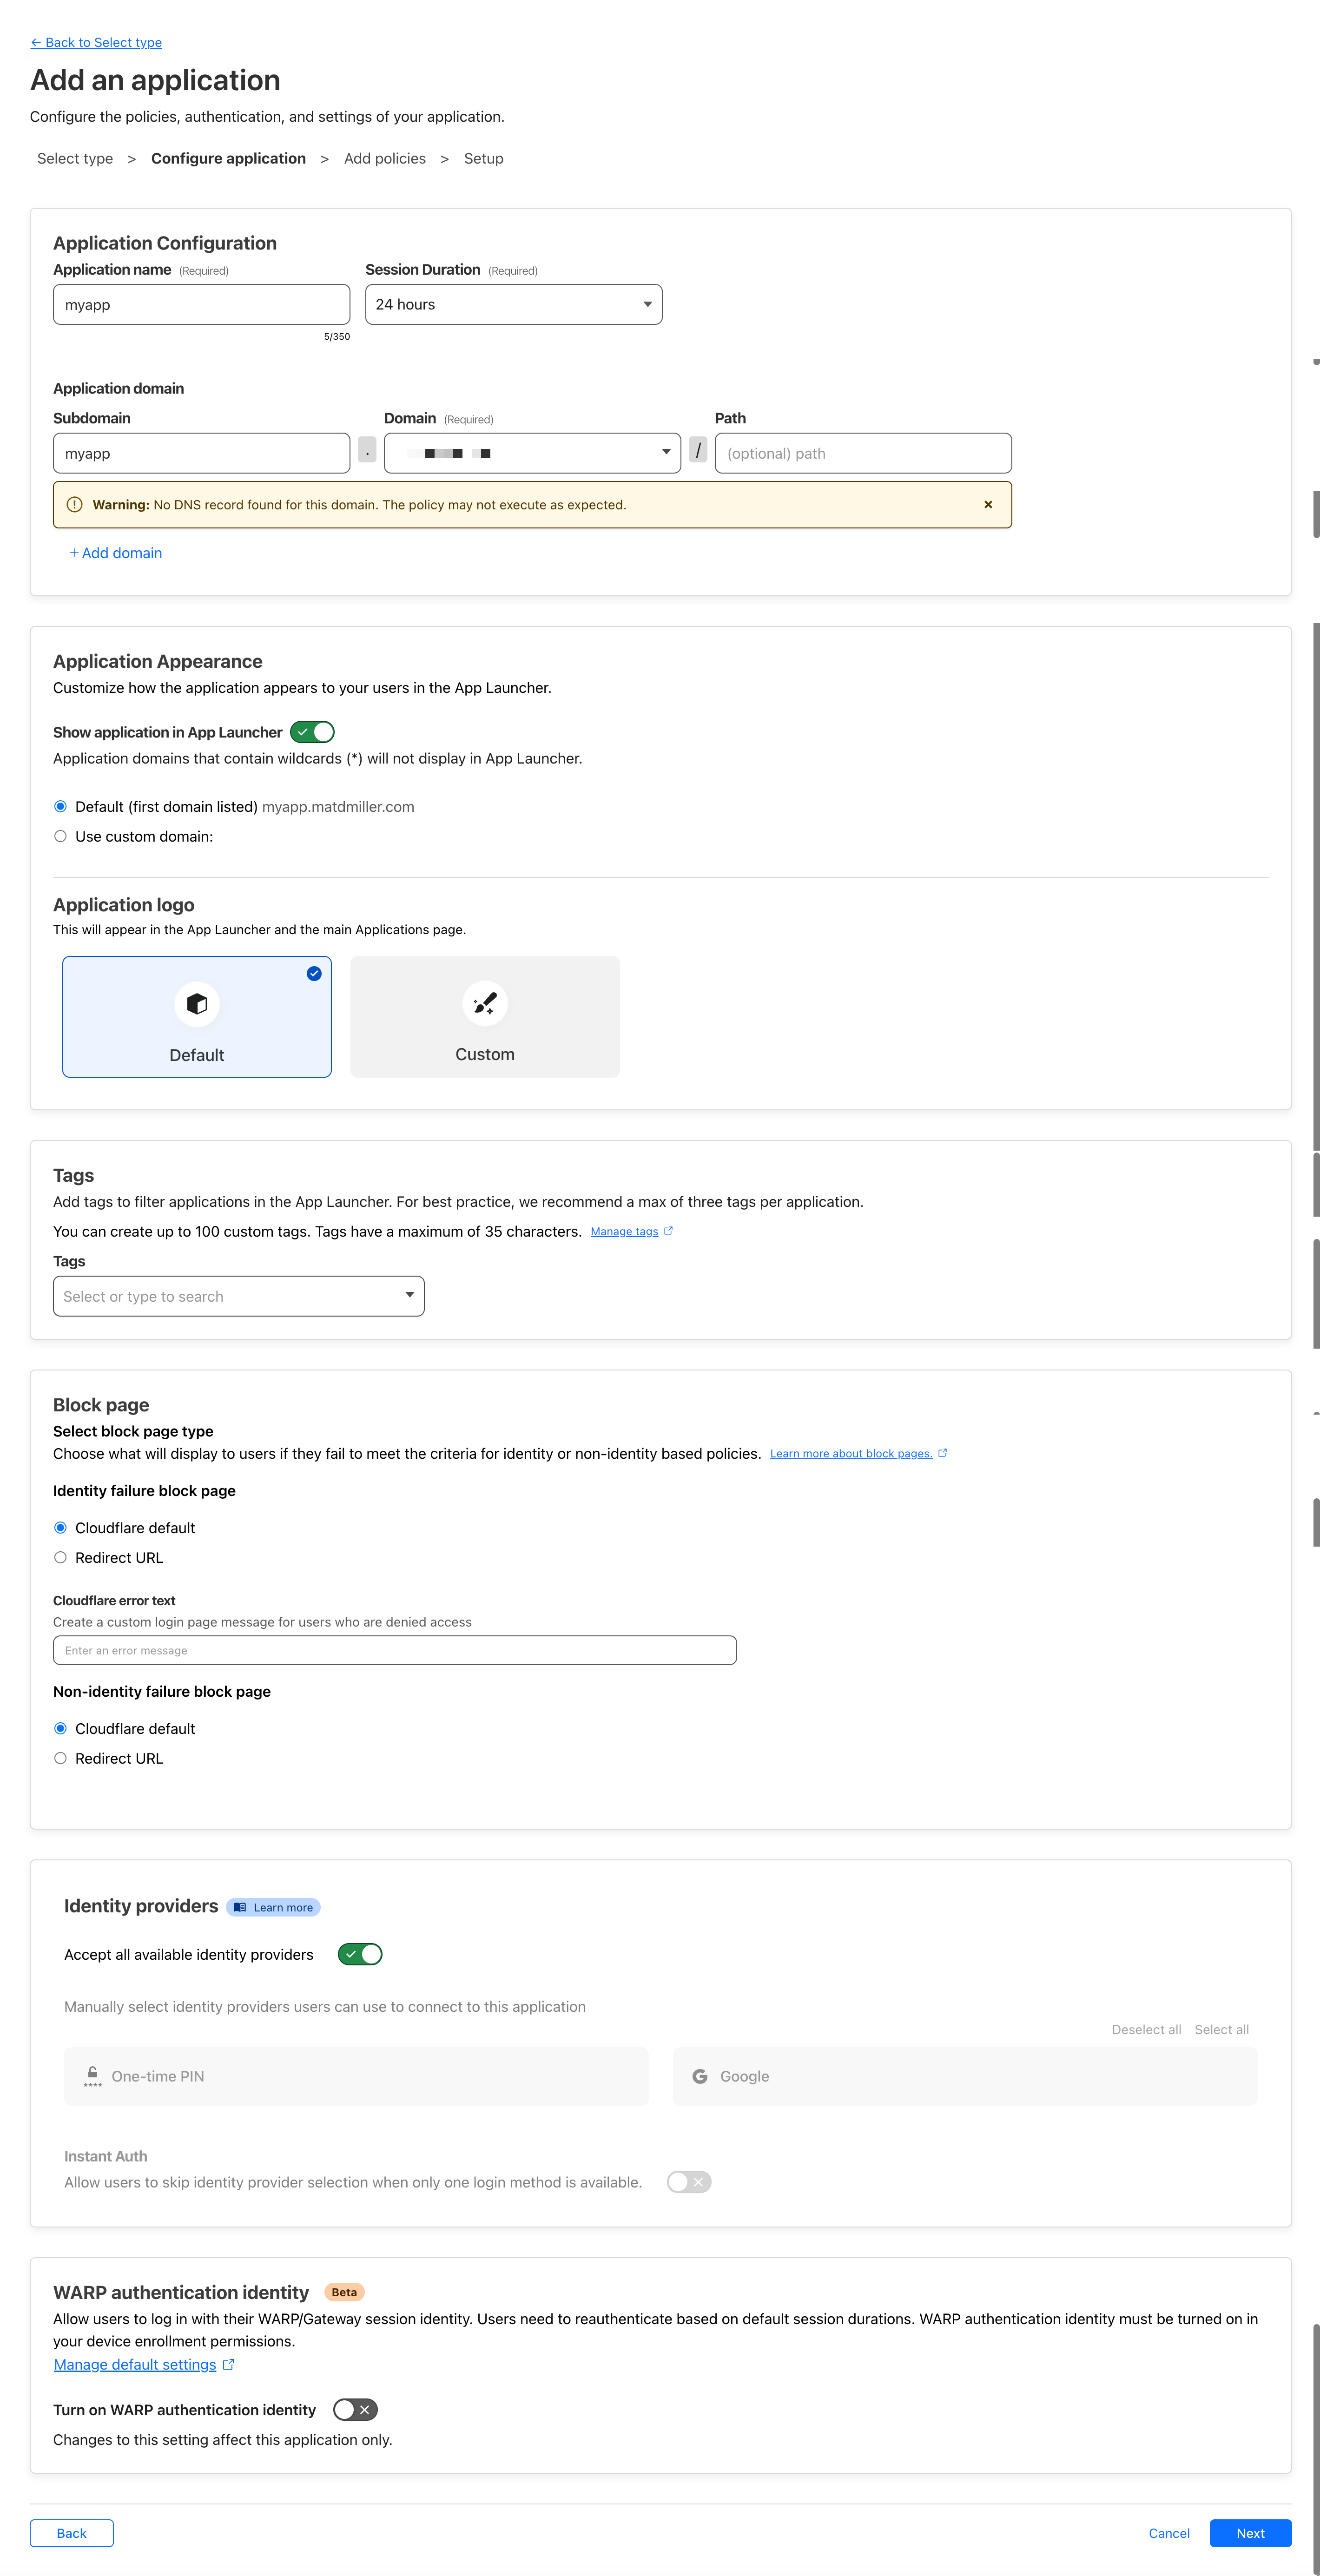
4.4 Adding A Master Wildcard Subdomain to apply security by default to any new applications
Navigate to Access -> Applications
Click on the “Add an application” button

Select “Self-hosted”
For “Application name” enter a name for your application (ex: “Master Wildcard”)
Under “Session Duration” select an appropriate duration for your session which is how long until the user will need to re-authenticate. If you plan on mostly using trusted devices you can set this to a longer duration but if you plan on using it on untrusted devices regularly you should set this to a shorter duration.
For “Subdomain” enter a wildcard
*For “Domain” select your domain name (ex: mydomain.com)
Under “Identity providers” select all of the identity providers you want to use to authenticate users. By default “One-time PIN” is selected which is Cloudflare’s magic link authentication. I recommend adding Google as a provider as well if you typically use Google accounts to access your applications.

Fill out any additional settings you want to apply to your application and the click “Next” at the bottom of the page.
Give your policy a name in the “Policy name” field.
Ensure that the group you created earlier is selected in the “Access group” field.
Add any additional rules you want to apply to your application and then click “Next” at the bottom of the page.

Select “HTTP only” under “Cookie settings” and add any additional settings you want to apply to your application and then click “Add application” at the bottom of the page to finish setting up your master wildcard subdomain.
4.5 Adding Your First Application
Let’s say you want to make a web application running on port 8080 accessible. In the Cloudflare Zero Trust dashboard:
Navigate to Networks -> Tunnels
Click on the tunnel you want to edit and then click on the “Edit” button
Click on the “Public Hostname” tab
Click on the “Add a public hostname” button

Enter your subdomain and select your domain (e.g., app.yourdomain.com)
Set the type to HTTP(S) and the URL to {your service ip address - ex: 192.168.1.100}:{your service port - ex: 8080} 6b. If your service is running HTTPS, click “Additional application settings” -> “TLS” -> and turn on “No TLS verify” if you’re running a self-signed certificate
Click on the “Save hostname” button

If you want to set up custom security settings for this application you can follow the steps above, but substitute the master wildcard subdomain for this application’s subdomain and whatever other settings you want to apply to this application.
5 Recommended Security Measures
While I’m not a security expert, here are some practices that have worked well for me:
Email Authentication: Create access groups and specify exactly which email addresses can access each application. This is a great additional layer of security to ensure that only trusted users have access to your applications.
Geographic Restrictions: Limit access to only the countries you need. Unless you have a specific reason, exclude countries known for hosting malicious traffic.
Network Segmentation: If possible, run your Cloudflare tunnel and exposed services on a separate VLAN. This provides an additional layer of protection for your main network.
Default Security: Set up a wildcard rule (*.yourdomain.com) with strict access controls as your default. This ensures new services are secure by default.
Two-Factor Authentication: Enable 2FA on your Cloudflare account - this is crucial since it controls access to all your services and your internal network.
These recommendations help create defense in depth without making the system overly complicated to manage. Each person should evaluate their own security needs and implement controls accordingly.
6 Performance Considerations
In my testing with a 5Gbps Google Fiber connection, I’ve seen:
- Port Forwarding: ~2.5-3 Gbps
- Cloudflare Tunnel: 500 Mbps download, 600-800 Mbps upload
While this is significantly slower than port forwarding, it’s more than adequate for most web applications and development work. The free tier has been more than sufficient for my personal use, though you should be mindful of bandwidth consumption, especially with media streaming. Don’t abuse the free bandwidth by hosting large media files or streaming services using free Cloudflare Tunnels.
For context, most home internet connections are well below these speeds, so the tunnel performance won’t be your bottleneck in most cases.
7 Real-World Example: AI Development Environment
Let’s look at how I’ve set up my AI development environment:
- Jupyter notebook server running on my GPU workstation
- Cloudflare Tunnel exposing it at jupyter.mydomain.com
- Email authentication only allowing access from my email address
- Geographic restriction to my home country
- HTTPS automatically handled by Cloudflare
This gives me secure access to GPU computing resources from anywhere, without the cost or complexity of cloud services. It’s kind of like having my own private Google Colab instance without any of the limitations.
8 Docker and Data Management
Most of my applications run in Docker containers, with volumes mapped to specific paths on my NAS. This approach: - Keeps application data separate from containers - Makes updates and container recreation simple - Ensures data persistence across container updates - Simplifies backup procedures
When setting up new applications, always plan your data storage strategy first. A common mistake is storing important data inside containers, which can be lost when containers are removed or updated.
9 Looking Forward
The ability to easily host applications on your own hardware creates powerful opportunities for running new AI-based applications locally, developing custom services, and experimenting with new technologies without worrying about cloud costs. In addition, this skillset you build by setting up your own Cloudflare Tunnels is increasingly valuable as businesses look to optimize their infrastructure costs by hosting their own applications locally using Cloudflare Tunnels.
10 Conclusion
Cloudflare Tunnels provides an excellent way to host personal projects and applications without the complexity of traditional networking setups or the ongoing costs of cloud services while providing enterprise-grade security features. While this guide focuses on personal projects, the same principles and technologies scale directly to business environments, from small startups to large enterprises. The skills you develop hosting your own applications this way are directly applicable to professional environments.
I particularly appreciate how this setup lets me focus on building and running applications rather than managing infrastructure. While there’s always more to learn and improve, this approach has enabled me to build and experiment without worrying about complex networking or excessive cloud costs.
Remember to evaluate your own security requirements and risk tolerance when implementing any solution. The configurations I’ve described work well for my needs, but your requirements may differ.
If you’re interested in learning more, I highly recommend checking out the Lawrence Systems video on Cloudflare Tunnels setup, which provides additional perspectives and implementation details. You can also check out the Cloudflare Tunnels documentation for more information.